


| Document history | ||
|---|---|---|
| V 1.0-1 | OCT 2006 |
|
| V 1.0-4 | NOV 2006 |
|
| V 2.0-1 | MAR 2008 |
|
| V 2.1-1 | JUL 2008 |
|
| v 2.2-1 | FEB 2009 |
|
1 - Introduction
Why would you want to use RPM on a non-Linux system ? It may seem strange as all these environments already provide a native package format.
Let me just explain how we got such an exotic idea.
I am a Unix system engineer. The platform I am working on contains some HP-UX, Solaris, AIX, and Linux servers. Historically, on this platform, the developers delivered their software in the form of a gzipped tar file. But this format is very poor as it just allows to gather a set of files into a single file, and the need of a smarter package format quickly arose.
The question was then to choose the package format(s) we would use. Each OS provides its native package format, which are incompatible. So, using the native package format for each OS would have forced the development and system teams to learn how to build and use all these formats, which is quite impractical. Having eliminated this option, we searched for a format to be used everywhere. Only two of the native package formats exist outside of their native OS : SD-UX (HP-UX) and RPM (RPM is not really available in precompiled form on every non-Linux systems but, as it is open-source, it can be compiled). SD-UX was discarded for several reasons, the main ones being that it is closed-source, expensive, and its future is not clear.
RPM remained alone with several benefits :
- It is easy to teach to the development and system administration teams,
- It is widely used and known. Most people we hire already know it,
- Combined with yum, it makes installation procedures very easy.
 We didn't consider other Linux package formats, like apt, because the
only Linux distribution we use is RedHat's RHEL.
We didn't consider other Linux package formats, like apt, because the
only Linux distribution we use is RedHat's RHEL.
Once the decision is made, we 'just' had to build RPM/YUM packages for all the environments. Although RPM is quite portable since version 5 (version 4 was very Linux-specific), this is not the case for YUM, whose port took a lot of time. This is due to several factors like poor documentation, complex dependencies, the need for a dedicated python interpreter... Actually, I wouldn't be surprised if it was the first time somebody builds it on a non-Linux system.
Well, the work is over now. Just follow the rest of this document and you too will be able to provide unified package installation/management procedures on all your Linux and non-Linux environments.
It will bring you the admiration of your {boss|colleagues|neighbours|wife|children|dog},
and, who knows, an appreciable boost in your
career ") .
.
1.1 - Intended audience
This document can be used in two different ways :
- In order to apply the procedure and build the software exactly as it is
described here, you don't need to be an expert : it just requires some basic
Unix and shell knowledge, such as being able to download the source
packages, uncompress/untar them, and create files with a text editor.
At this level, the procedure given below can be splitted in two main steps :- you first set a limited number of environment variables (essentially the installation directory)
- and the rest is just a suite of copy/paste operations from the document to your shell environment.
- Now, if you want to understand everything that is explained below, or if
you want to adapt it to your specific needs, it requires of course more
knowledge on different domains, mostly :
- build mechanisms in general,
- compile and link operations (with a strong focus on shared libraries),
- makefiles,
- the Gnu autoconf-based configure/make process,
- and even, when it is really needed, the ability to understand and adapt some C source code.
So, to resume, most people will just apply the procedure described below, which is relatively easy and just requires a basic working knowledge of the Unix shell environment.
Don't hesitate to post comments on issues you may have with this
document. Each time you do it, you help me and the community in general to make
the procedure more robust and reliable. I promise to reply to every question
asked in comments. Please prefer comments to direct mail as they may benefit
others.
1.2 - Getting the source packages
Some readers sometimes ask why I don't provide copies of the source packages I list below. Sure, it would be easier for you, but I won't do it as you MUST get your source packages from a repository you can trust ! You don't know me, you CANNOT trust source code downloaded from my site (except for my own projects).
So, once again, always get your software from a trusted source and, when a package signature is provided, check it to make sure you get the official code.
I insist on this because compiling some modified source code or installing some corrupted precompiled binaries would give hackers everything they need to take control on your site (remember that most software we compile here runs as root).
In every chapter below, you will find a link to the best place to get the source package from.
So, remain a good, slightly paranoid, system administrator, and everything will go well.
1.3 - Software dependencies
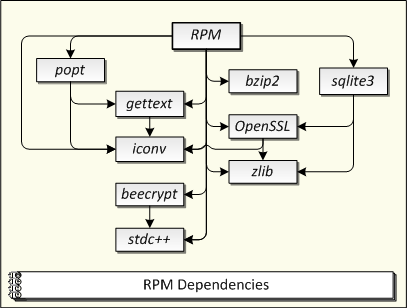
The following diagram displays the libraries RPM depends upon and their relationships.
yum has a very complex dependency diagram, that you'll find in the table below. If someone builds a readable graphical representation from this, I'll be glad to include it :
| Module... | ...uses / depends on... |
|---|---|
| zlib | <none> |
| bzip2 | <none> |
| openssl | zlib, iconv |
| iconv | <none> |
| beecrypt | stdc++ |
| expat | <none> |
| ncurses | <none> |
| gettext | iconv |
| glib | gettext, iconv, pcre |
| popt | gettext, iconv |
| libffi | <none> |
| sqlite3 | <none> |
| gnupg | bzip2, zlib, gettext, iconv |
| libgpg-error | gettext, iconv |
| gpgme | gnupg, libgpg-error |
| gdbm | <none> |
| python | libffi, sqlite3, bz2, ssl, glib, pygpgme, iconv, gettext, ncurses, xml2, zlib, rpm |
| xml2 | iconv, zlib |
| urlgrabber | python |
| pygpgme | python, gpgme |
| yum-metadata-parser | python |
| intltool | <none> |
| yum | python, rpm, sqlite3, yum-metadata-parser, urlgrabber, pygpgme, gettext, zlib, intltool |
1.4 - Notational conventions
Everything written in black on grey can be copy/pasted without any modification.
Everything written in red and between '<' and '>' symbols must be replaced by a value corresponding to your environment.
Example : when you read this :
dir=<$BASE> |
you must replace <$BASE> with your base directory path in the line you will actually type.
but, when you read this :
dir=$BASE |
you copy and paste it asis into your environment.
1.5 - Context
| Host model : | rp4440 |
| OS : | HP-UX 11.11 (32-bit) |
| Hardware platform : | HP PA Risc |
| Shell : | /bin/sh |
| User : | root (not mandatory) |
1.6 - Pre-requisite
| Product | Version | Source |
|---|---|---|
| gcc (C & C++) | 4.1.1 | http://hpux.connect.org.uk/ |
| GNU make | 3.80 | |
| GNU tar | any | |
| XML::Parser perl module | any | http://search.cpan.org/~msergeant/XML-Parser-2.36/Parser.pm |
2 - Building
2.1 - Environment
First, we define the install (target) base directory :
export BASE=<your install directory> |
We ensure that the LIBPATH, LD_LIBRARY_PATH, and SHLIB_PATH variables are unset. Only one of them applies to this system but it is simpler to unset them all on every OS :
unset LIBPATH LD_LIBRARY_PATH SHLIB_PATH || : |
If the shell environment contains aliases for cp, rm, or mv, it is time to unalias them :
unalias cp rm mv 2>/dev/null || : |
Then, we set the variables we use for every software and on every OS. Among others, we ensure that /usr/local/bin is in the PATH :
export BLIB=$BASE/libs |
C compilers can have such different behaviors that I strongly recommend
using gcc. If you are using another compiler, please don't ask for support.
Now, we set the 'make' commands we'll use in the rest of the document. The difference between $MK and $SMK is that, in $MK, you can add options for a 'parallel make' ('-j', '-l', ...). $SMK stands for 'serial make' and is used where parallel builds are known to fail.
Mileage varies concerning parallel make. Depending on your host characteristics and the options you set, the build can be faster or slower. Personnally, after trying several options, I did not observe a noticeable gain in performance and reverted to the default 'serial' make.
Please note that parallel make can
cause compilation failures. So, if you get unexpected results
while parallel make options are active, the first thing to do is to retry the same
without the parallel options. For more info about parallel make, see the
GNU make manual.
GNU make is mandatory as several packages absolutely require it. On
Linux, GNU make is native but, on non-Linux systems, you are strongly advised
not to use the native make.
export MAKE='gmake' |
We also un-localize the shell environment :
unset LANG LC_MONETARY LC_TIME LC_MESSAGES LC_CTYPE \ |
We now set the variables specific to this operating system :
export LDFLAGS="-L$BLIB/common/lib -Wl,+b -Wl,$BLIB/common/lib" |
2.2 - Creating the target structure
Every libraries and auxiliary software are installed under '$BASE/libs'. There, each software/library is assigned a subdirectory, and we populate a 'common' subdirectory with symbolic links to the actual file locations. Using a common directory populated with symbolic links brings several benefits :
- it allows to set a single path in the dynamic lib search path (LDFLAGS).
- it also allows to set a single path in the include file search path (CPPFLAGS)
- Putting a common 'bin' subdirectory as first element of the PATH ensures that anything we put in this directory will be found first when searching for an executable command.
- Last, it allows to set a single path in the PKG_CONFIG_PATH variable.
Thanks to this directory structure, we don't have to modify the environment variables each time we add a library to the package. It becomes also easier to ensure that the compilation will reference our embedded library/include files, and not the ones that can be installed elsewhere in the system.
First, we create the base common directory.
mkdir -p $BLIB/common |
Then, we create the script to populate the common directories. Every time we build and install a library we need to reference in a subsequent build, we call this script to register the files in the common structure. This is done through the $LINKDIR environment variable.
Note that the
link creation script is not in the common PATH. This way, it cannot conflict
with another file.
#-- Declare the variable we use to
call the script |
#-- Create the script |
2.3 - Embedding a private libgcc_s library
Some files we generate have a runtime dependency on the libgcc_s shared library. It means that this library must be present on the target host. In accordance with our 'black box' approach, we embed a libgcc_s library in the package and we force everyone to reference this copy.
mkdir -p $BLIB/gcc/lib |
If you don't have a libgcc_s shared library on your system, the best
solution is to rebuild gcc
(gmake bootstrap builds the shared gcc lib we need).
2.4 - Compiling the stdc++ library (4.1.1)
Source : http://gcc.gnu.org
Here, you need to download gcc-core and gcc-g++. Uncompress/untar them in the same directory. Note that you will need GNU tar to read the gcc-core source package.
If you get errors in this part, and if
you use a pre-built gcc compiler, you should first try to rebuild your gcc
compiler from source code. It is not guaranteed to solve your problems but it
generally did for me.
cd libstdc++-v3 |
2.5 - Compiling zlib (1.2.3)
Source : http://www.zlib.net/
The zlib library provides the gzip (GNU zip) compression/decompression features.
./configure --shared --prefix=$BLIB/z |
2.6 - Compiling the bzip2 library (1.0.1)
Source : http://www.digistar.com/bzip2/
Before starting the compile phase, we need to remove some linux-specific options from the makefile :
cp Makefile-libbz2_so Makefile-libbz2_so.orig |
As the current makefile ignores our LDFLAGS settings, we link the shared library with our own command.
We also must install the files ourselves as the Makefile is unable to do it.
$MK -f Makefile-libbz2_so |
2.7 - Compiling the OpenSSL library (0.9.8j)
Source : http://www.openssl.org/source/
Web site : http://www.openssl.org/
As the configuration process ignores the LDFLAGS environment
variable, we modify several variables related to the way
the libraries will be linked.
./config --openssldir=$BLIB/ssl shared zlib |
2.8 - Compiling the iconv library (1.12)
Source : ftp://ftp.gnu.org/gnu/libiconv
Web site : http://www.gnu.org/software/libiconv/
./configure --prefix=$BLIB/iconv
\ |
2.9 - Compiling the beecrypt library (4.1.2)
Source : http://sourceforge.net/projects/beecrypt
We create a symbolic link in include/beecrypt. This way, the header
files can be included as '#include <xxx.h>' or '#include <beecrypt/xxx.h>'.
./configure --prefix=$BLIB/beecrypt \ |
2.10 - Compiling the expat library (2.0.1)
Source : http://sourceforge.net/project/showfiles.php?group_id=10127
Web site : http://expat.sourceforge.net/
./configure --prefix=$BLIB/expat $CF_OPTS |
2.11 - Compiling the ncurses library (5.7)
Source : http://www.gnu.org/software/ncurses/
We force the Makefiles to link through gcc, instead of calling
ld directly, because we want our LDFLAGS to be used and it may
contain options which are not supported by ld (as the options starting with
-Wl).
./configure
--prefix=$BLIB/ncurses\ |
2.12 - Compiling pkg-config (0.23)
Source : http://pkg-config.freedesktop.org/wiki/
./configure --prefix=$BLIB/pkg-config $CF_OPTS |
2.13 - Compiling gettext (0.17)
Source : ftp://ftp.gnu.org/gnu/gettext/
Web site : http://www.gnu.org/software/gettext/gettext.html
The '-with-included-gettext' configure option forces to build and use the included libintl library, even if one is present in the system libraries. This removes a dependency to the system libraries and ensures that we use the same libintl code across all platforms.
Note that, even if we try to disable NLS localization everywhere it is
possible, some software don't allow it to be disabled. That's why we still need
to embed a libintl library.
./configure
--prefix=$BLIB/gettext $CF_OPTS \ |
2.14 - Compiling the pcre library (7.8)
Source : http://www.pcre.org/
./configure --prefix=$BLIB/pcre --disable-cpp $CF_OPTS |
2.15 - Compiling glib (2.14.5)
Source : ftp://ftp.gtk.org/pub/glib
./configure --prefix=$BLIB/glib \ |
2.16 - Compiling the popt library (1.13)
Source : http://freshmeat.net/projects/popt/
./configure --prefix=$BLIB/popt \ |
2.17 - Compiling libffi (3.0.4)
Source : http://sources.redhat.com/libffi/
./configure --prefix=$BLIB/ffi $CF_OPTS |
2.18 - Compiling the sqlite3 library (3.5.7)
Source : http://www.sqlite.org (download sqlite-amalgamation-3.5.7.tar.gz)
As Sqlite does not install a 'pkg-config' information file, we add it. It is not mandatory but suppresses several warning messages in subsequent builds.
cat >sqlite3.pc.in <<EOF |
Then, we build and install (we keep the library and include files only) :
./configure --prefix=$BLIB/sqlite3 $CF_OPTS |
2.19 - Compiling gnupg (1.4.8)
Source : http://gnupg.org/
./configure --prefix=$BLIB/gnupg \ |
2.20 - Compiling libgpg-error (1.6)
Source : http://gnupg.org/download/index.en.html
./configure --prefix=$BLIB/gpg-error \ |
2.21 - Compiling gpgme (1.1.4)
Source : http://gnupg.org/download/index.en.html
./configure --prefix=$BLIB/gpgme \ |
2.22 - Compiling the gdbm library (1.8.3)
Source : http://www.gnu.org/software/gdbm/
./configure
--prefix=$BLIB/gdbm |
2.23 - Compiling python (2.5.2)
Source : http://www.python.org
We modify the 'Lib/distutils/unixccompiler.py' because the link options it provides are incompatible with gcc.
sed 's/"\+s -L" \+ dir/[]/' <Lib/distutils/unixccompiler.py >tmp |
We build python in several steps because the Makefile uses the LD_LIBRARY_PATH environment variable, which is not portable.
LINKFORSHARED=' ' \ |
2.24 - Compiling the xml2 library (2.7.2)
Source : http://xmlsoft.org/
./configure --prefix=$BLIB/xml2 \ |
2.25 - Compiling urlgrabber (3.0.0)
Source : http://linux.duke.edu/projects/urlgrabber/
$PYTHON setup.py install |
2.26 - Compiling pygpgme (0.1)
Source : http://pypi.python.org/pypi/pygpgme
$PYTHON setup.py install |
2.27 - Compiling yum-metadata-parser (1.1.2)
Source : http://yum.baseurl.org/
We must add the path to the pkg-config command, as setup.py is unable to use the $PKG_CONFIG environment variable.
PATH="`dirname $PKG_CONFIG`:$PATH" $PYTHON setup.py install |
2.28 - Compiling intltool (0.34.2)
Source : http://www.linuxfromscratch.org/blfs/view/stable/general/intltool.html
./configure --prefix=$BLIB/intltool |
2.29 - Compiling yum (3.2.13)
Source : http://yum.baseurl.org
Most of the yum Makefiles are too Linux-specific, so we have to build it 'by hand'. We also cannot use the install command because it is not compatible with the Linux install syntax.
We also modify the python code to reflect the fact that we don't install in '/'.
cp_compile() |
2.30 - Compiling createrepo (0.9.5)
Source : http://createrepo.baseurl.org/
This tool complements yum as it allows to create a yum repository (it extracts the needed metadata from a set of rpm files and stores it, so that yum can access it when needed).
Here, we use the shell functions we defined for yum.
cp_filter 755 ./genpkgmetadata.py
share/createrepo/genpkgmetadata.py |
2.31 - Compiling RPM (5.0.2)
Source : http://rpm5.org/
The default build is unable to install remote packages (specified as an http:// or ftp:// argument). A workaround is to force ufdio mode for every file access :
#-- Replace every occurence of %{?_rpmgio} |
On HP-UX, the strtoull() function is not defined, and must be replaced
by __strtoull(). The same for strtoll() replaced by __strtoll().
We use sqlite as the default API to access the rpm DB, because of issues
with db4/mmap(), especially on HP-UX.
CPPFLAGS="$CPPFLAGS
-I $BLIB/python/include/python2.5 \ |
If we don't comment out the '%buildroot' macro, the binary builds ('-bb' flag) fail with a 'file not found' error :
sed -e 's/^\(%buildroot.*\)$/#\1/' <$BASE/lib/rpm/macros
>/tmp/t1 |
We also comment out the '%__check_files' macro, as it is useless without '%buildroot'.
sed -e 's/^\(%__check_files.*\)$/#\1/' <$BASE/lib/rpm/macros
>/tmp/t1 |
Then, we create a 'platform' file. This file is needed on HP-UX because :
- the uname() system call returns '9000/800' as machine field, which, unfortunately, contains a '/' character. This causes various errors when the %{ARCH} macro is used in a file path. We override this value with 'hppa' (which is cleaner than the default 'hppa2.0w' CPU type).
- The default computed 'host_os' field is 'hpux11.11' but it is then truncated to 8 chars : we replace it with a shorter string :
mkdir -p $BASE/etc/rpm |
We also modify the 'macros' file accordingly :
sed \ |
The next step is optional and sets some personal preferences :
- As I work with several operating systems and several versions, I prefer the rpm files I build to be named with an explicit OS and version. So, I modify the _build_name_fmt definition.
- By default, rpm is configured to display the architecture field when replying to an 'rpm -q' query. I prefer the same behavior as on Linux, where only the names, versions, and releases are displayed.
- I don't want requires/provides entries to be auto-generated by rpmbuild. The requires and provides elements I want to be associated with my packages are the ones I explicitely mention in the spec files and that's enough.
sed \ |
2.32 - Creating the RPM database
$BASE/bin/rpm --initdb |
2.33 - Initializing the database
Now, we populate the database with some software supposed to be present on every host.
The first step is to define a shell function to register a virtual package. This function receives the description of a package in spec format, and registers it in the rpm database :
virtual_rpm() |
Now, we register our virtual package :
( |
We also register the RPM software itself in its own database :
virtual_rpm <<EOF |
You can use the virtual_rpm function again to register other files and directories specific to your environment.
3 - Checking
To check that your RPM/YUM package is functional, here are some typical commands you may run and the results to expect (<nothing> means that nothing should be displayed):
# export PATH="$BASE/bin:$PATH" |
Of course, these basic tests are not exhaustive, but they at least ensure that the basic mechanisms are OK : the RPM database is accessible, the sysdeps and rpm virtual packages are correctly registered, the provides/requires engine is functional, and yum correctly communicates with the RPM layer. It is quite basic but, speaking for my own case, everytime I had problems with an RPM build, even these basic tests did not work. So, if you get there, you should be quite confident in your RPM/YUM software.
4 - Packaging
4.1 - SD-UX
4.1.1 - Creating the package
SD stands for Software Distributor. It is the HP-UX' native package format. More documentation about SD and the commands we use in this chapter can be found in the Software Distributor Administration Guide for HP-UX.
As RPM depends on the PHSS_33035 HP-UX patch, we will bundle them together.
We do it in several steps :
1. Create a Package Description File in /tmp/depot.psf. Fill this file with the following contents, replacing the fields in red with the appropriate values (__BASE__ must be replaced by the value of $BASE) :
depot |
2. Now, we create a temporary depot of type directory, containing every file under $BASE. This depot will also contain the symbolic links we need in /usr/bin and /usr/share/man to access directly the RPM commands and man pages :
swpackage \ |
3. Download the corequisite patch PHSS_33035 from the HP ITRC website. Uncompress it to a depot file. Then, copy the patch to your temporary depot with this command :
swcopy -s <absolute path of the patch depot file> \ |
4. Create a bundle in the temporary depot. This bundle will reference RPM and the patch. Note that you will need to install Ignite-UX to get the make_bundles command (Ignite-UX is available from the HP-UX install media) :
make_bundles -B -t "RPM Bundle" -n b_rpm -r "2.1-1"
/tmp/rpm.depot.tmp |
5. Now, convert the temporary depot to a file depot and remove the temporary depot :
swpackage -s /tmp/rpm.depot.tmp -x media_type=tape @ /tmp/rpm.depot |
You now have your final SD depot in the /tmp/rpm.depot file.
4.1.2 - Installing the package
As the package is a native SD-UX package, it is installed via the HP-UX swinstall command.
4.2 - Tar/gzip
A tar package just contains every files under $BASE.
4.2.1 - Creating the package
The commands to build a tar/gz package are :
cd $BASE |
This creates a '.tgz' package file in /tmp.
4.2.2 - Installing the package
To install the package :
- Download the package file on the target host
- Create the $BASE directory
- Ensure the file system containing the $BASE directory has enough free space
- Untar/uncompress the package file in $BASE.
5 - The end
 Enjoy !
