


| 1. Introduction |
| 2. Download the PHK building software |
| 3. The subfiles |
| 4. The Package Specification File |
| 5. Build the package |
| 6. Running the package |
| 6.1. CLI mode |
| 6.2. Web mode |
| 7. Displaying information |
| 7.1. CLI mode |
| 7.2. web mode (webinfo) |
1 - Introduction
This tutorial explains how to build a basic PHK package. Here, you will learn :
- what a Package Specification File is and how to create one, setting your package's options
- how to build a PHK package
- how to display its information, both in CLI and webinfo mode.
We'll follow the tradition : the package we are building here is a typical 'hello, world' example. When run, it just displays a welcome message.
In order to illustrate the autoload system, we'll display the message through an autoloaded class..
This tutorial can be run on any operating system. For this basic example, everything is created and run in a single directory.
Before you start, please ensure that your PHP version is 5.3.0 or newer.
2 - Download the PHK building software
First, if not already done, download the latest distribution from Github. The software comes in the form of a tar/gz file. Uncompress/untar it, you will find a file named phkmgr. This is the PHK building/management tool. The rest of the distribution is made of docs, tests, and examples.
Now, create an empty directory, anywhere on the system, cd there, and copy the phkmgr file into this directory (use a 'ls -l' to check that the copy is executable). This will be our base directory.
 For the sake of simplicity, we put the
phkmgr file in our base directory. In a real build
environement, it would probably be located elsewhere on the system, to be shared by every project. This
file is needed to create PHK packages only. It must not be distributed along with the resulting
packages,
which are self-sufficient.
For the sake of simplicity, we put the
phkmgr file in our base directory. In a real build
environement, it would probably be located elsewhere on the system, to be shared by every project. This
file is needed to create PHK packages only. It must not be distributed along with the resulting
packages,
which are self-sufficient.
3 - The subfiles
Create a subdirectory named 'src'. In this subdirectory, create these 3 files :
- our main script, named 'hello.php' :
<?php |
- a file named 'message.php', containing the 'Message' class :
<?php |
- and a file named 'env.php', containing the 'EnvInfo' class :
<?php |
That's all for the PHP code. Now we will focus on the package's parameters.
4 - The Package Specification File
In the PHK documentation, PSF stands for Package Specification File. As its name implies, this file contains every information needed to build the package.
Here, we create a very basic, almost minimal, PSF. What do we have to specify ?
- where to get the source files we want to include into the package and where they will be inserted in the package's virtual tree,
- the package's meta-information : name, author, version, etc. These are optional but, on a real package, it is always cleaner to set as much information as possible. The list of possible information is quite long and includes every possible aspects of authorship, licensing, dependencies...
- The entry points. PHK supports multiple entry points, which means, for instance, that different scripts can be executed when the package is executed in CLI mode or accessed though the web. Here we will execute the same script for CLI and web access (exercise: once you finish this tutorial, use a different script for CLI and web access).
Create a file named 'hello.psf' with the following content :
# Add the src subdir and its content as /src |
The default syntax for PSF meta-information is Yaml. It is also
possible to use JSON or a PHP script returning an array.
The complete list of supported options is in the PHK
builder's guide.
5 - Build the package
Now, we have everything we need to build the package.
We will assume that the 'php' command (or the 'php.exe' file on Windows) is in your path. If it is not the case, prefix the command below with the complete path to your PHP executable.
In command line mode (in a shell/command window), run:
./phkmgr build hello.phk |
This command will build a 'hello.phk' package file in the current directory. If everything goes well, it shouldn't display anything.
You may note that we didn't specify anything to have the class names
recorded in the autoload map, as it is the default behavior.
6 - Running the package
Now, we run our new PHK package.
6.1 - CLI mode
# php hello.phk |
Amazing, it works !
Note that the 'Message' and 'EnvInfo' classes were
automagically loaded, as they are not explicitely included.
6.2 - Web mode
Copy your 'hello.phk' file to a directory you can access through a web server and rename it to hello.php (so that the web server recognizes it as a PHP script).
Later, you will configure your web server to associate the '.phk'
suffix with PHP but, for this tutorial, it is easier to rename the file with a
known file suffix.
Now, display it in your favorite browser :
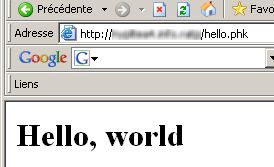
It works again !
You will note that it is now displayed in HTML, showing
that everything was autoloaded correctly.
7 - Displaying information
7.1 - CLI mode
Now, we are going to display some technical information about this new package. Of course, as you are the package's author, it's quite useless but imagine you just downloaded this package from a remote website :
Run :
# php hello.phk @techinfo |
We can also display the list of its subfiles:
# php hello.phk @showfiles |
And, finally, we display the package's symbol map. As we could expect, it contains our two classes :
# php hello.phk @showmap |
Now, it's time to display these information in a browser.
7.2 - web mode (webinfo)
In order to switch to webinfo mode, you will create an empty file in the same directory as the 'hello.php' file. This new file must be named 'hello.php.webinfo'. Once you have created this file, ask your browser to access the same URL as above (the one which displayed 'Hello, World' in HTML). You should get a very different result :
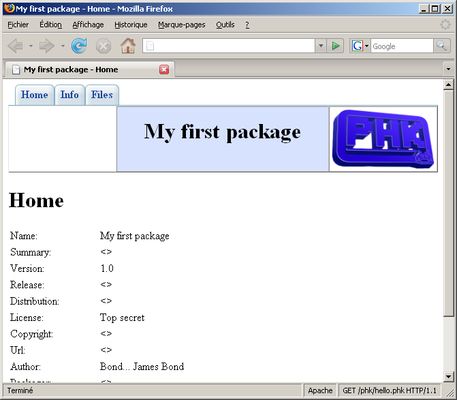
Your package now runs in webinfo mode and it behaves as a small website showing information about the package. Navigate through the different pages by using the tabs at the top of the screen. Note that there is no 'License' or 'Help' tab, as we didn't define the corresponding options.
Now, you know how to build a simple PHK package. But PHK still provides a lot of features you will discover in the PHK builder's guide.
